Category Archives: Fabric Crafts

Felt Butterflies

Hello Dear Readers,

It really has been years since I last posted and I’ve been feeling the blogging itch recently. I am determined to begin my sharing again!

I had been super busy working at my school in Berlin and so have not had the space to share my creations of the last years; there have been so many creations, so I may from time to time introduce a previous project to you.

Today I would like to share a spring/Easter project I completed just yesterday: a felt, embroidered butterfly. I saw something similar in a children’s nature-toys catalog and had to try make one. Miss K also made one herself! (She can now confidently thread her own needle at 4 years old, which makes my hands more useful for my own projects.)

If you would like to make one, I have included instructions and a pattern below. Happy sewing!

IMG_3548

You will need:

– coloured felt sheets

– coloured thread

– a needle

– pattern (printed and cut out)

Felt Butterfly Pattern

Instructions:

1. Once you have cut out the pieces of felt in the colours you have chosen (4 pieces: 1x big wings, 1x small wings, 2x body) place pieces together and baste-stitch the body together.

IMG_3544

Haphazard blue basting-stitch on yellow body-part.

2. Blanket stitch around the body (you may need to do this on each side respectively around the wing-area).

3. Embroider the wings as desired. I used detached chain stitch to make the antennae as well.

Rope basket for balls of wool

I don’t know about you, but when I knit one of two things happen – ball of wool slowly makes a run for it and ends up around toddler or toddler slowly makes a run for it (eyes fixed on me) with my ball of wool. There is not so much I can do about the second problem as Miss K has a knack of getting into everything these days, but I finally got around to tackling the escapee wool situation.

I would love to have one of those ceramic ball-of-wool holders, but it wouldn’t last long. I had surplus rope and thought to give it a crack with that.

Coiled rope basket project - Mrs Winter Creates

Coiled rope basket project – Mrs Winter Creates

My original idea was to make a closable sphere with a small hole for the yarn to feed through. I made the opening by holding one round using red thread that would be cut later.

Red thread used to hold shape - Mrs Winter Creates

Red thread used to hold shape – Mrs Winter Creates

Red thread cut off to create opeining - Mrs Winter Creates

Red thread cut off to create opeining – Mrs Winter Creates

I left the hole in the top should I want to put two balls of wool in there and a handle so that it could be hung on certain things. I fastened it with a button and ribbon.

Button and ribbon fastening - Mrs Winter Creates

Button and ribbon fastening – Mrs Winter Creates

It did not sit so well when hung, as you can see in the above photo. This wasn’t so good and then quality control came along…

Quality control - Mrs Winter Creates

Quality control – Mrs Winter Creates

What's inside there? - Mrs Winter Creates

What’s inside there? – Mrs Winter Creates

The wool was quickly evicted and my creation deformed. I decided to take it apart a bit and keep it simple. Miss K was going to get into it anyways; ‘I’ll make it a little less interesting’, I thought.

Finished yarn feeder basket - Mrs Winter Creates

Finished yarn feeder basket – Mrs Winter Creates

I’ve started making little woollen dolls using the basket to hold the yarn and it is great. Miss K has used it a few times, mostly as a baby in her mini stroller, but it has been relatively safe. I really love how it looks like a skep (beehive basket).

Has anyone else got any other contraptions to help with escapee balls of wool?


Improvisational pleating, folded

I’ve been working on the Tinny dress from Straightgrain for her improvisational pleating contest and today I finished my entry.

Straightgrain Tinny dress with improvisational pleating on cuffs and hem - Mrs Winter Creates

Straightgrain Tinny dress with improvisational pleating on cuffs and hem – Mrs Winter Creates

My improvisational pleating technique was to create deep pin-tucks in the red fabric with folded pieces of the contrasting floral fabric wedged inside. This is then folded to one side and creates a small flap. I featured this detail on the cuffs and the hem of the skirt and decided not to use it on the collar.

Straightgrain Tinny dress with improvisational pleating on cuffs and hem - Mrs Winter Creates

Straightgrain Tinny dress with improvisational pleating on cuffs and hem – Mrs Winter Creates

The red material I used is a light and soft cotton fabric, matte on one side and slightly shiny on the other. It is lightweight while the floral print is medium weight and this caused some difficulty with the finishing on the feature pleats, but all in all, I think it worked quite splendidly!

Straightgrain Tinny dress with improvisational pleating on cuffs and hem - Mrs Winter Creates

Straightgrain Tinny dress with improvisational pleating on cuffs and hem – Mrs Winter Creates

The floral fabric is called Breezy and is by P&B Textiles. The flowers are from a watercolour painting and they are bright and soft. I don’t usually go for such bright fabrics, but sometimes it is worth living a little on the wild side.

Straightgrain Tinny dress with improvisational pleating on cuffs and hem - Mrs Winter Creates

Straightgrain Tinny dress with improvisational pleating on cuffs and hem – Mrs Winter Creates

I made a size 2 as soon enough Miss K will be growing out of her mountain of 12-18 month old clothing and I need to prepare. I didn’t quite manage to make the zip invisible somehow, but I am telling myself that this will give it a bit more room for future growth spurts…

Straightgrain Tinny dress with improvisational pleating on cuffs and hem - Mrs Winter Creates

Straightgrain Tinny dress with improvisational pleating on cuffs and hem – Mrs Winter Creates

I put piping on the sleeve end, around the waist and at the hem. I think the hem would have finished up better if I had put it on both sides of the pleated detail. The fabric’s shouting colours tend to draw the eye from the dress’ imperfections, thank goodness.

Straightgrain Tinny dress with improvisational pleating on cuffs and hem - Mrs Winter Creates

Straightgrain Tinny dress with improvisational pleating on cuffs and hem – Mrs Winter Creates

As I chased Miss K around the park, the dress got quite a few comments. It is rather nerve-racking chasing a socialite toddler around a park with lots of water. I’m glad I made the effort and went outside – it was a glorious, mild day and we met some new friends.

Thanks to An of Straightgrain for this fun task, it’s my first ever contest entry and I think the result was worth the effort. On the 21st (that is in 4 days) she will be opening a link-party, where you can see what other people have done and vote for your favourite. I hope I’ve made myself a contender, I’m also really looking forward to seeing any nifty pleating techniques that others have created to use in my future projects.

Straightgrain Tinny dress with improvisational pleating on cuffs and hem - Mrs Winter Creates

Straightgrain Tinny dress with improvisational pleating on cuffs and hem – Mrs Winter Creates

And dear reader, you still have a few days to get your own project underway and finished! Maybe I’ll see you at the link party?

0de40-improvisationalpleatingthecontest

Felt Easter hares, no bunny about it

Miss K and I have had a week of being spoilt by my mother who has come to visit. Raw food cafes, long walks in the park or to toddler-friendly playgrounds, shopping for craft materials or new dresses for Miss K; I am full of gratitude, thanks mum!

Unfortunately my mother won’t be here during Easter, but she has been helping me get ready for it. Yesterday she went to get some smoked Polish sausages for the Easter basket and I finished the little felt Easter hares.

Easter hares - felt

Easter hares – felt

A hare is a different creature to a rabbit, especially socially. As I understand, they are largely solitary animals, but will warn other hares of danger by hitting their foot to the ground. A female hare can conceive a second litter of babies, while pregnant with the first. They are rather extraordinary and fill me with a feeling of awe.

I got the pattern for the hare from the book The Nature Corner, by M. van Leewen and J. Moeskops (Floris books, 1990). In their book they write

“Traditionally hares belong to Easter because of their selfless way of life: it is said that when a hare is being hunted and grows tired, another hare will take over and run out in front of the hunters.” (p34)

So there seem to be many different stories of the hare at Easter, and although we have no hares in Australia and the bilby has become an Easter icon here as well as the more popular, American Easter bunny, hares have a place in my heart from the traditions of my childhood.

Easter hares - felt hares

Easter hares – felt hares

Even though spring is not the thing here, we have some amazing flowers in bloom at the moment as you can see from the pics. The darker one is called a Banksia and the lighter a King Protea. They are two of my favourites. They are so beautiful I thought I would include a few extra photos:

King Protea and Basnksia flower arrangement

King Protea and Basnksia flower arrangement

Banksia flower

Banksia flower

How are your Easter preparations going?

Preparing for the Passion

Easter is just a few weeks away. That was quick.

We don’t celebrate it big in our little family, but the memories of childhood make me feel that I would like to create that magic for my children too. I come from a Polish, Roman Catholic family, and though we did not continue going to weekly mass after I was about 11 or 12, we kept alive the Polish traditions and customs right into my siblings and my adulthood.

Some of my dearest childhood memories are of Easter time: taming my desire for something chosen during lent, days of preparing the feast for a large brunch after the fast, dying and decorating easter eggs and preparing easter baskets for blessing, dressing in the traditional costume posted to us by my babcia (grandmother) from Poland, the joyful Easter Sunday mass and blessing festival attended by family and friends,  sharing the egg before the feast and giving blessings to each other, celebrating with what family we had here in Australia and the friends who had become our family. These memories weave together a feeling of richness and depth, meaning and reverence, and it is something I find I miss in every-day adult life.

I do sense that now I have a little person to cherish and share with, some of these traditions will live on. Last year I was still too new to motherhood to be able to contemplate the preparations, this year I feel quite excited about getting together the basket for blessing and going to the Polish church with Miss K to experience the festival. I don’t expect to celebrate as large as we did when I was a child, but I am taking the first real steps towards a nourishing tradition for the Winters.

Hem of Easter dress for Miss K

Hem of Easter dress for Miss K

The last few days I have been getting Miss K’s costume ready. My auntie made her a dress out of an heirloom european pillowcase and I’ve been hand stitching a decorative border to it that my babcia in Poland gave me when she gifted me her treasury of lace and edgings from since she was young.

Hand stitching on heirloom decorative border lace

Hand stitching on heirloom decorative border lace

Traditionally, girls wear strings of spherical beads, red or in other colours. I decided to be a little different and make Miss K her own block and chain necklace to match the decorative border on the dress.

Block and chain necklace for Miss K

Block and chain necklace for Miss K

I’ve also started on a handmade Easter basket in which to put all the important things (mainly food) that need blessing. You can begin yours too by following my video tutorial on how to make coil baskets.

This is just the beginning of my preparations for the Easter celebration. A number of you have requested that I post a tutorial of how to dye easter eggs with onion skin the way I was taught as a child, I will gladly acquiesce to your request!

I will also post on what preparations are necessary for a great easter basket – a symbol of abundance and life, of plenty, of spring.

Of course here in Australia the seasons turn toward autumn, or the Nyoongar season of Djeran, the season of adulthood, which is the precursor to Makuru, the season of fertility in June and July. In this part of traditional Aboriginal Australia, fertility occurs in what is commonly called winter. This is because water is needed for fertility and summer has a way of drying and burning the landscape to a gold against a sky of relentless blue. We certainly do not have that sense of abandon and creation as one feels during a European Easter time, but as the heat subsides, green appears after autumn showers and with it the possibility of a mild and habitable landscape is once again here.

I hope you will join me during this last part of Passiontide. To explore the good and meaningful moments that busy hands can create. To remember what it is to be deep in the service of others, no matter what our belief; or as Leunig wrote:

“Let us live in such a way
That when we die
Our love will survive
And continue to grow.

Amen.”


Quick sashiko cloth basket

Every now and then my dear husband comes to me with a very serious problem… there is a hole in the crutch of his jeans. This usually comes with a side comment that he was hoping to wear them the next day. I usually tell him to deposit them into the mending box, from which very few things return, though surprisingly they are often the only things that actually come out. This actually has nothing to do with how much I love him and much more to do with the fact that mending jeans reminds me of sashiko. Needless to say I have been known to eye off said jeans for months until they just get too worn to mend anymore. Poor jeans, poor husband, happy Mrs Winter.

Stitch detail - sashiko on old jeans

Stitch detail – sashiko on old jeans

I was particularly happy to finally get a pair of grey jeans from him, where the inside is much darker than the stone-washed outside. I started stitching the front of one leg many months ago with no real idea of what it might become; then a few days ago I looked at it and it came to me, I wanted to make a cloth basket. I have seen them around made of canvas in neutral, gold and bright colours and I had been thinking how much I’d love to make one.

There are many tips, designs and tutorials online on how to do sashiko from what I can gather, so I’m not covering that here. Below is a tutorial for the basket itself. It is quite large, perfect for a medium sized knitting wool collection or a small bin. The best fabrics to use are stiff and fairly thick. This was so quick to make and I really look forward to making more.

Large cloth basket tutorial

You will need:

pattern pieces

pattern pieces

80cm (30in) x 20cm (7.8 in) of feature fabric – this is the sashiko stitched jeans in my case
80cm (30in) x 12cm (4.7in) of hessian
one hessian circle with a 24cm (9.4in) diameter
one strong cotton (calico/canvas) circle, also 24cm (9.4in) in diameter

Instructions:

1. Finish off all the edges of the hessian rectangle piece. Finish off the edges of the hessian circle by zig-zaging or overlocking (surging) together with the strong cotton circle.

finishing off edges of hessian fabrics - circle detail

Cloth basket tutorial – finishing off edges of hessian fabrics – circle detail

2. Pin the hessian and feature rectangle pieces together at the desired edge and sew together

Sewing together the hessian and feature rectangle pieces

Sewing together the hessian and feature rectangle pieces

3. Fold this out and refold lengthwise, right sides together. Sew together side seam

sewing side seam

sewing side seam

4. Cut excess material from this side seam

Cloth basket tutorial - cutting off excess material from side seam

Cloth basket tutorial – cutting off excess material from side seam

5. Turn right side out and sew the same seam again (making a french seam)

stitching a french seam

stitching a french seam

6. Turn inside out and pin in circle piece to bottom edge.

(If you find the circle is too big, pin down half and hold the basket upright to see how big it should be. Mark this size, cut the new circle, finish this edge and pin this correctly sized circle to the bottom edge.)

Pin circle piece to the bottom edge

Pin circle piece to the bottom edge

7. Sew the circle to the feature piece using zig-zag for extra stiffness

8. Turn right side out and fold the lip down 1/3 and then 1/2 again. All done!

Folded down basket lip - here with a peg to keep lip and bin bag in place

Folded down basket lip – here with a peg to keep lip and bin bag in place

The lip does not stay in place so easily, but I really wanted the option of folding the edge of a bin bag into it so that rubbish doesn’t fall into the actual basket. I’ve used pegs to keep it in place. Did you solve this problem differently?


Playsuit with a pleat from Elegance and Elephants

I’ve been making this awesome playsuit since Miss K. was about 9 months old. I think the one I finished today is about my 5th. It’s an easy to follow and adorable pattern. It might seem impractical for a baby without the snaps at the crotch, but I would like to try and convince you otherwise…

When Miss K. was born in November in Berlin, when outside it began to snow and I had my mother placing tea, chicory coffee and water by my feeding chair every few hours, I would dress baby almost exclusively in footed overalls. When a baby is so new, the bonus is that such clothing doesn’t squeeze on their delicate little tummy.

As she has gotten older, she has especially loved playing in sand and as you know, that stuff gets everywhere. With a properly legged playsuit, that particular problem is pretty much solved. Sure, it isn’t as easy as taking off some pants or leggings for those less than desirable parenting moments, in winter it takes some practise getting the straps undone under her jumper or jacket, but it has it’s perks and is called a playsuit for a very good reason. I would also generally rate clothing as easier to clean than sand sticking to a soft baby bum.

Pleated Playsuit from Elegance and Elephants

Pleated Playsuit from Elegance and Elephants

This design from Elegance and Elephants is an easy and enjoyable sewing project. It is actually the first PDF pattern I have ever made and has exceeded my expectations. It is so much easier to follow the instructions given with photos and I’ve traced multiple sizes of the pattern onto baking paper. Best of all, I reckon the finished playsuit is a great gift for other little people.

The first one I made in all peach fabric with just the straps, lining, pockets and cuffs in a contrasting fabric. It was the size 12 months version. Here are some photos:

The first Pleated Playsuit (Elephants and Elegance) I made for Miss K

The first Pleated Playsuit (Elephants and Elegance) I made for Miss K

Strap detail of Pleated Playsuit from Elegance & Elephants

Strap detail of Pleated Playsuit from Elegance & Elephants

It actually still fits on her, albeit rather tightly, 6 months later. Sadly, I don’t think I will be using it again, so I needed to make another. I decided to skip the size 18 months and go straight for size 2. It is definitely too big, so I guess I will need to make an 18 months one as well.

The Pleated Playsuit (Elephants and Elegance) I made for Miss K

The size 2 Pleated Playsuit (Elephants and Elegance) I made for Miss K

As you can see, I got a bit creative with the fabric combinations. That’s because I don’t see the point in hiding a brilliant Nani Iro print and I wanted it for all to see on the bodice. If you are wondering where to get Nani Iro fabric from, I highly recommend buying it from Frances at Miss Matatabi on Etsy. Although I’ve never met the lass, she is very helpful and stocks an excellent range.

Nani Iro print in Elegance & Elephant's Pleated Playsuit

Nani Iro print in Elegance & Elephant’s Pleated Playsuit

As the bodice is contrasting I made the straps and lining in the pant material and the pockets and cuffs in the beautiful double gauze Nani Iro print. The pants are made of a thicker, but still fairly soft, cotton for wear and tear.

I’m making another at the moment for a friend with Liberty print in the same way. In fact I really like how you can show off a nice and delicate fabric in a not so delicately used item of clothing.

Pleated Playsuit (E&E) in use. A reclining Miss K.

Pleated Playsuit (E&E) in use. A reclining Miss K.

Time to play!

What are your favourite PDF patterns. I’d love to try some new projects.

Tutorial – rust, lavender and blueberry ecoprint

Dyeing silk with plant material. yum. That sums up how I feel about it.

Lebenskünstler recently lent the book Eco Colour by India Flint and it reignited a passion of mine. When I was studying fine arts at university I worked a lot with plant and mineral colour, particularly with rust and pomegranate juice. It is a kind of mysterious alchemy, the way in which materials might be coaxed into giving forth unforeseen (or even expected) shades of colour. I always feel nourished doing a little bit of dyeing.

I had a few silk scarves on my materials shelf and I decided to try out some foraged materials. This tutorial is for a rust, blueberry and lavender silk scarf. The colours that came out in my scarf are a light grey-blue background, with rust, purple, plum and blue for most of the pattern. There are darker accents of prussian blue also.

plant dye tutorial - rust, lavender and blueberry scarf

plant dye tutorial – rust, lavender and blueberry scarf

Here is what you will need:

Silk to dye
A handful of frozen blueberries cut in half
A collection of small rusty objects. I cut triangles from a rusty metal band.
A bunch of lavender flowers (mine were dried)
Water
A copper pot or a piece of oxidised copper
A tea strainer (like those you get in glass teapots) or something you can wrap the silk around and boil (a stone or thick stick for example)
String (like jute or thick cotton string)

None of this is particular toxic (with the copper and iron, you don’t want to go drinking the water afterwards and it needs to be disposed of safely), but it is best to use a pot that isn’t for food. I used an old beat-up teapot that had copper rust inside.

old rusty teapot used for dying

old rusty teapot used for dying

Here’s how to get started:

1. Dampen your silk and lay it flat on a large surface. At the bottom edge, arrange your lavender in a line horizontally  and fold silk so that it is covered over, then fold once more so that it can not so easily move. Arrange the blueberries with cut half down horizontally in the same way on the next free part of silk (not on the folded part) and fold it neatly in as well. Fold once again to secure and repeat the process with the bits of rusty stuff.

Rust triangles are in a row ready to be folded into the scarf

Rust triangles are in a row ready to be folded into the scarf. Note the blueberries already folded in on the bottom edge of photograph.

2. Wrap the rest of the silk around itself so that you end up with a flat-ish strip. Wrap this around your tea-strainer, stone or stick. Wrap it tightly, around and around.

plant dye tutorial - rust, lavender and blueberry scarf

plant dye tutorial – rust, lavender and blueberry scarf

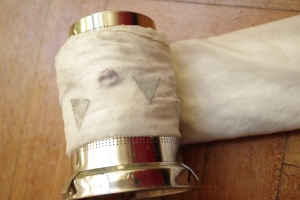
3. Tie up tightly with the cotton string to secure everything in place. (I probably should have tied it a few more times around. Surprisingly it stayed in place.)

plant dye tutorial - rust, lavender and blueberry scarf

plant dye tutorial – rust, lavender and blueberry scarf

4. Place this into your pot  and add water. Boil and then simmer for 2 hours. Your kitchen will smell lovely, like lavender.

Into the pot. Plant dye tutorial - rust, lavender and blueberry scarf

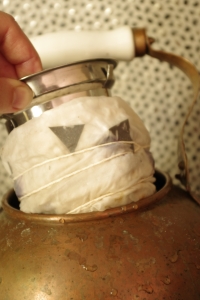
Into the pot. Plant dye tutorial – rust, lavender and blueberry scarf

5. Once it has boiled let it stand in the pot for at least 24 hours (this is by far the HARDEST part). Then carefully remove the silk without moving the parts (or you can just leave it on the stone or stick) and put it in enough water to keep it damp but that the air can oxidise the rusty metal. Leave it in this as many days as you can bear. I was totally impatient and only left it one day. It is TOTALLY worth leaving it longer, I just caved.

Allowing the rust to set. Plant dye tutorial - rust, lavender and blueberry scarf

Allowing the rust to set. Plant dye tutorial – rust, lavender and blueberry scarf

6. Once you take it out, get rid of the rusty metal and blueberry bits and lavender flowers, rinsing the whole scarf in cold water. Iron the scarf dry and flat. Now it is ready to wear!

plant dye tutorial - rust, lavender and blueberry scarf

plant dye tutorial – rust, lavender and blueberry scarf

Just a note to say that these colours might not be as lightfast as conventional, synthetic dyes, but in my experience they are much more subtle, harmonious and even change with the seasons sometimes. You can always dye over the top if they fade too.

Enjoy!