Monthly Archives: January 2014

Yoghurt fail makes a mean curry

Here is my most recent yoghurt fail:

yoghurt fail makes mean curry

yoghurt fail makes mean curry

I tried not to be daunted. This was by far the worst yoghurt I have ever made. It was too tangy and super curdled. I couldn’t make pancakes out of this one. I had made some kind of cheese – yoghurt cheese. Incidentally, people apparently make something like this on purpose…

Before I knew there was such thing as yoghurt cheese, that is this afternoon, I decided that my ‘yoghurt’ looked enough like a cottage cheese to try and make some sort of pannier out of it for a curry. I was definitely not going to post this unless it worked. As it happens even my hubby gave this daring experiment the thumbs up. Yay for me.

A note to say – this is not a recipe for real pannier. It is a recipe to avoid throwing out failed yoghurt. Enjoy!

For the cheese balls/ MrsW pannier:

1.5 cups of curdled yoghurt
1 egg
2 tablespoons of flour
salt and pepper to taste

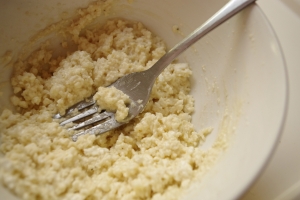
Mix it all together and it should look a little like this

yoghurt fail makes mean curry - cheese mixture

yoghurt fail makes mean curry – cheese mixture

Try to get any larger stringy lumps out. You should be able to make little cheese balls out of the mixture. If it is too dry add more egg or some yoghurt. If it is too wet, add more flour. Form the mixture into balls about 2-3cm (1in) in diameter. Leave these to the side for a moment. You might also like to put some rice on the boil now.

yoghurt fail makes mean curry - small cheese balls

yoghurt fail makes mean curry – small cheese balls

For the curry:

lots of oil (I think it is about half a cup, just make sure everything is well lubricated, especially when cooking the cheese)
1 teaspoon of ginger powder
2 teaspoons of turmeric powder
2 teaspoons of your favourite curry powder
1 teaspoon of coriander powder
1 small onion, diced
2 cloves of garlic, crushed

1 teaspoon of chilli oil
an assortment of chopped veggies
  (I used left over steamed potato, peas and also fried fish)

Put some oil and all the spices into your non-stick pan and heat up while stirring until the aroma is delicious. Add oil, onion and garlic and saute for a few minutes.

yoghurt fail makes mean curry - spices, onion and garlic

yoghurt fail makes mean curry – spices, onion and garlic – yup I cut a corner

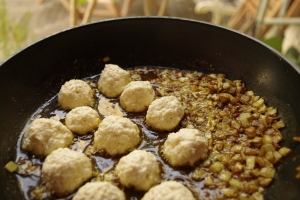
Now add more oil again, this time for the cheese balls. There has to be enough oil so that these will definitely not stick. Something like this:

yoghurt fail makes mean curry - cooking the cheese balls

yoghurt fail makes mean curry – cooking the cheese balls

As you can see, I moved the onion and garlic out of the way. Turn the cheese balls over once golden brown and once both sides are done take them out of the pan to add to the curry later.

Now add all your veggies and cook until soft. Place the cheese balls back into the pan to heat up and serve on rice with yoghurt on the side.

The cheese balls end up more like patties. Miss K stole a few before I could get them back into the pan, she thought them delicious. They make a pretty good toddler snack on their own. Maybe you want to take out the chilli oil out of the curry mix if you think it might be too much for your little one.

yoghurt fail makes mean curry - Miss K enjoying the curry and the cheese balls

yoghurt fail makes mean curry – Miss K enjoying the curry and the cheese balls

Has anyone else done something interesting with yoghurt cheese? Would love to hear if so.

Frozen fruit icy-poles

Just a quick one tonight. I know I’ve been a bit quiet, that is basically because I’ve been getting through 3 sewing projects at once – there’s something to look forward to I hope!

I love frozen fruit icy-poles, that is why instead of spending a small fortune buying them, I make them with fruit bought on sale during the last hour at the local markets. Three or four $1 bags make six icy-poles; which is how many cases I have. That is better than $10 for four…

I have found they work much better with some fruit rather than others. I avoid watermelon, rock melon, any melons actually – they somehow taste overripe or yuk when frozen for me. Also not a good idea to put under ripe fruit in, because it is obvious in the taste.

Fresh frozen fruit icy-poles

Fresh frozen fruit icy-poles – plum, pineapple and one banana

Here are some of our favourite combinations:

Apricot, pineapple, one banana and a tablespoon of passionfruit pulp

Plum, pineapple and one banana

Mango, apricot, pineapple, one banana and a tablespoon of passionfruit pulp

I blend the ingredients together using a smoothie maker, but you could use a mortar and pestle if you had the patience… or a hand blender. I find that adding banana to each mix gives the icy-pole the right texture and ensures it doesn’t harden too much if the other fruit is particularly watery. If I haven’t quite made enough mixture, I stuff in some blueberries (which I have a surplus of thanks to mum) or other small pieces of fruit at the top. This also makes them look interesting.

Fresh frozen fruit icy-poles

I am no longer allowed to hold the icy-pole I share with Miss K…

I still haven’t experimented with yoghurt or cream – I’ll keep you posted if something good comes of that.

Have you made your own icy-poles? What are your favourite combinations?

Gingerbread in the raw

I was trying to clean out the pantry and realised I had too much of a few things and that put together they might make something interesting. Most of it was dried fruit and nuts – perfect for raw bliss balls or bars. I thought it would be nice to shape them, perhaps using a cookie cutter. This is all I could find:

cookie cutter

cookie cutter

I am assuming it is meant to be a ginger bread man. It is actually more harmonious upside down, like the Japanese Yen.

All the same, that gave me the idea – how about raw, sugar-free gingerbread?! It always irks me how much cane sugar you need to make a good gingerbread. And for those of you who are into it, these babies are also vegan and gluten-free.

It took a while to make them because I was juggling a toddler who is teething 4 molars and honing her photography skills.

Miss K. practising using the shoot button on our camera

Miss K. practising using the shoot button on our camera

Actually, these are super quick to make. Here’s how:

Ingredients:
1 cup of dried apricots (chopped into pieces is best)
1 cup of cashew nuts
1 cup of goji berries
1 heaped tablespoon of tahini
1/4 cup of coconut oil (plus extra in case it isn’t holding together)
2 teaspoons of gingerbread spices
a pinch of salt
some chocolate covered goji berries for decoration

~After some taste-testing and cookie reviews, it is suggested that you add something more for sweetness – agave, honey, dates, even (gasp) sugar. It seems I really do not have a sweet tooth as these are definitely sweet enough for me as they are. For a normal person, I think more is necessary.~

Raw gingerbread - the ingredients

Raw gingerbread – the ingredients

Basically, throw everything except the chocolate covered goji berries in the blender and make it as smooth as you wish. You might need to add extra coconut oil to get the right consistency and have a taste to see if you want to have a more spicy mix, in which case add some more spices.

Since the mix is sticky, I found it much easier to press it into the cookie cutter. I compacted the mix inside the cookie cutter so that it held together and then carefully eased it out.

I then shaped them a bit more by hand and stuck on a chocolate gogi berry for the belly button.

Raw, sugar-free gingerbread recipe

Raw, sugar-free gingerbread recipe

It’s pretty hot and so mine are pretty mushy. I put them into the fridge to harden, ready to take them to a crafternoon at my friend’s from Deer Little Fox.

Hot Chilli Summer – how to make chilli oil

It was hot again today. Yucky, sticky, muggy hot. So I thought, let’s make chilli oil!

chilli baby - how to make hot chilli oil

chilli baby – how to make hot chilli oil

If something survives my style of gardening and the heat at the moment, then it deserves some recognition. Our chillies are really taking to the treatment they get, and surplus is my favourite thing. This post is not much more than a homage to our chillies.

hot green chilli - how to make chilli oil

hot green chilli – how to make chilli oil

On the topic of brave fruit, Miss K. is fascinated by the chillies, which just seems to pop up so quickly. Today as we picked the chillies to make the oil, she took a bite out of one. I was rather worried, forgot to stay calm as I ran to her saying ‘no, no’ and fished it out of her mouth. I took a bite to see how hot it was and whoa, that was some potent heat I had in my mouth, but you know what – she did not flinch. Amazing girl.

hot chilli oil

how to make hot chilli oil

Anyways, I needed to do something with all these chillies, so I thought oil. This way I could preserve them and be able to use them countless amounts of times. Below is the simple recipe.

Ingredients:

1 cup of chopped fresh chillies
500mL (17oz) of oil – I used grapeseed oil for it’s higher temp. threshold and mild flavour

Chop up chillies and put into pan with all the oil. Let it simmer for 5 or 10 minutes just to make sure it won’t grow legs. Allow this too cool while you boil or steam the glass jar/bottle in which you will preserve your oil. Carefully get the oil inside your jar/bottle.

Careful of what your hands touch and clean up thoroughly so you don’t blind anyone accidentally.

Actually, I hear from quite a few people to just cut up the chillies and put them in the oil, without cooking or anything. Either way, the oil and chillies have to sit for a week or so before getting the chilli flavour. Once mine has the flavour going I’ll post a recipe using it.

My jar of chilli oil in a rather unglamorous photo

My jar of chilli oil in a rather unglamorous photo

How to make a block and chain necklace

I’ve been accumulating so many craft supplies over the years. Some of it is well travelled and some of it was waiting here in boxes for us to return for a decent amount of time. As I unpacked those boxes, I got rid of so much stuff, but I can never bring myself to throw out craft supplies. There is just so much potential to make something that someone will like…

My inexhaustible bead collection is a prime example. After a year of looking at it just sit there collecting dust, I finally got an idea of what I’d like to make. I’ve called it the block and chain necklace.

Silver and Turquoise necklace

Silver and Turquoise necklace

I had a few chains lying around – copper, brass and silver – lovely things to work with. I wanted to create long necklaces that are mostly chain with a feature string of beads added.

How to make a block and chain necklace - rainbow and chunky chain

How to make a block and chain necklace – rainbow and chunky chain

I’ve already made a few to sell or wear, but I thought today I might do a tutorial on how to make such a necklace yourself. The best thing about these is that they can be very classy or cute or kitsch and they still work. Miss K. is a great connoisseur of these kinds of things and she particularly likes the more chunky, colourful ones.

Not a teething ring!

How to make a block and chain necklace – not a teething ring!

I think this would be a really wonderful activity with older children, but let’s think about ourselves for once – what would you like yours made from? Favourite stones? Will you splash out on some silver?

Here is what you will need:

a length of chain 40cm (16in) or longer
Tiger Tail – about 10-20cm (4-8in)
2 crimps to match your chain
beads of choice – enough for about 20cm (8in)
small wire cutters (or some old scissors)
flat nose pliers

The beads, crimps and tiger tail might lead you to a bead shop. It would be a good idea to ask them to show you how to use crimps or for you to do a youtube search as it’s rather hard to explain and photograph as I have found out…

Actually, you can get beads in many places. My favourite is going to an op shop or a bulk semi-prescious stone store. Many things can also be made into beads with a drill.

Once you have your materials assembled, you can start.

Instructions:

Thread Tiger Tail into one end of your chain and secure it in place by using the flat nose pliers on a crimp. Leave an extra centimetre or so of Tiger Tail to thread into the first and maybe second bead along with the main length, otherwise it can end up poking into you and being mighty uncomfortable (be aware that some small beads don’t have big enough holes to do this). Have look carefully at the photo below; under where the flat nose pliers are, is the main length of chain as well as a small amount for the purpose above (both these pass through the crimp that was squished by the pliers).

How to make block and chain necklace - crimping the Tiger Tail to one end of the chain

How to make a block and chain necklace – crimping the Tiger Tail to one end of the chain

Now measure off the Tiger Tail to the desired length. Let it hang a little lower than usual I reckon. Make sure you can fit the whole thing over your head as there will be no clasp to undo. Add 5cm (2in) to the desired length and cut the Tiger Tail. For example, if you want your beads to span 20cm, cut the Tiger Tail at 25cm so you have enough room to attach the other end to the chain. Again, make sure this will fit over your head!

Thread your chosen beads onto the Tiger Tail. You should have about 5cm (2in) of Tiger Tail left sticking out once the beads are threaded on. Lastly, thread on your other crimp like a bead, thread the Tiger Tail through the other end of your chain and then through the crimp and first (and maybe second) bead. The picture below is meant to illustrate the rather convoluted instructions I just gave…

How to make a block and chain necklace - securing onto chain

How to make a block and chain necklace – securing onto chain

You want to pull the Tiger Tail carefully through, so that the crimp is close to both the chain and the beads, but be careful not to make the Tiger Tail too tight that the beads lose their curve. Crimp this in place and cut off the excess Tiger Tail after the first or second bead so that it is hidden inside neatly.

Now it is ready to wear.

How to make a block and chain necklace - it's been a sweltering day, but Miss K. doesn't mind wearing a necklace

How to make a block and chain necklace – it’s been a sweltering day, but Miss K. doesn’t mind wearing a necklace

I have found that the thing that takes the longest with these necklaces is choosing the right beads, but that is also the fun part.

I’d love to see your block and chain necklaces if you make one. Send links/pics so we can have a look.

Fruit and Nut Rye Sourdough

My mum showed me how to make sourdough starter over the Christmas holidays. I have done no research to check that how she does it is right and I am sure there are many posts by talented bakers on how to make the started and bread, but I am happy with my results so far and thought I would share them none-the-less.

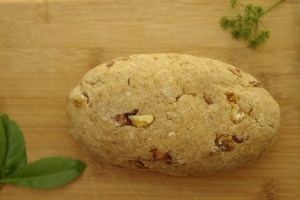
Fruit and Nut Rye Sourdough

Fruit and Nut Rye Sourdough

The starter was easy – in a jar (1 Litre capacity or a bit more)  mix two heaped tablespoons of rye flour in warm water and float some bits of your favourite farmer’s market rye sourdough bread on top. Keep the top open. Keep the thing warm for a few days like you want it to hatch a chick. You can do this by putting it in a large bowl half filled with warm water at least 4 times a day, for example. Smell for that sour flavour; it will also get a little bit of froth like yeast. Put the cap on and keep it in the fridge until you need to use it.

So I had this starter in the fridge, waiting for me and some rather vague instructions on making bread from my mother. She said that the sourdough started doesn’t rise the bread enough, so to add some yeast – doesn’t that defeat the purpose? I used self raising instead and the result was lovely.

Fruit and Nut Rye Sourdough

Fruit and Nut Rye Sourdough

I made little loaves – more like buns, but a little bigger. Bread is a new skill for me and I didn’t want to end up with uncooked insides.

Miss K. and I enjoyed kneading the dough with its added textures of dried  fruit and nuts. It was a lovely day outside so we did most of our work there again.

Fruit and Nut Rye Sourdough - fun for little hands too

Fruit and Nut Rye Sourdough – fun for little hands too

Fruit and Nut Rye Sourdough

2 cups of self-raising wheat flour
1 cup of rye flour
1 cup of dehydrated fruit and nuts of your choice
sourdough starter
pinch of salt
tablespoon of honey made thin with a few tablespoons of water

Rub together the flours, salt and the dehydrated fruit and nuts. Add the honey mixture and some of the sourdough starter and mix together. Keep adding the starter until you have a nice firm dough consistency. Knead the dough for 5 or so minutes and separate into two small loaves.

Fruit and Nut Rye Sourdough - kneading and shaping

Fruit and Nut Rye Sourdough – kneading and shaping

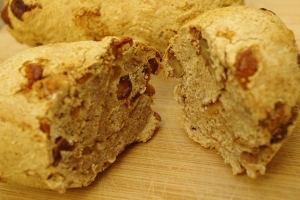
Enjoy a cup of tea while the dough has a sunbath or sits in a warm place. Heat your oven to 200’C (390’F), place in your loaves and cook for 30 minutes. Serve hot with butter or eat cool later on.

Fruit and Nut Rye Sourdough - serve hot with butter

Fruit and Nut Rye Sourdough – serve hot with butter

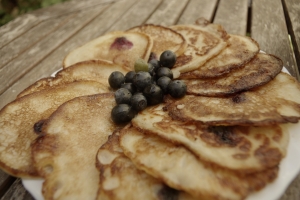
Leftover yoghurt? Blueberry pancakes!

I’ve been making lots of yogurt, experimenting with different cultures and have ended up with a rather difficult-to-overcome surplus. Yesterday I really couldn’t figure out how we were going to eat it all, so I decided I would use it by making pancakes. I cultured this yogurt using buttermilk, so I guessed it would work out, and it did.

4 ingredients

I am a bit of a yoguphile – could live on the stuff. I love it untouched, unsweetened and all that. I’m a bit crunchy about it, so I want it organic on our shoestring budget. Because of all this I make my own now. Super simple – more on that later.

4 ingredients

4 ingredients

The recipe for the pancakes is also really easy and perfect for the toddler (or grazing husband/partner) in your life. To the sweet-tooths out there – the pancakes are not particularly sweet and you may wish to add a bit of something. Miss K., well she is sweet enough…

Here is how much she enjoyed them:

Miss K. certainly enjoyed them.

Miss K. certainly enjoyed them.

I would say the foot raised to the table is a clear sign of appreciation. Just a warning to say that her legs were stained blue and red afterwards (any suggestions for removing such stains from toddler skin?)

So here goes…

BLUEBERRY YOGHURT PANCAKES
(enough for a toddler lunch, with some for mum/dad)

400mL (1.5 cups/ 13oz) of yoghurt
1 large egg
about a cup of flour
two or more handfuls of blueberries

Mix together yoghurt and egg, slowly add flour and stir constantly. Add as much flour as necessary to make mixture the consistency of honey. Stir through blueberries.

Heat your frypan with the fat of choice (I use olive oil) and cook your little pancakes until golden brown. Serve it with some fresh berries or banana, or more yoghurt, or just as they are.

yum yum

yum yum